Wednesday, 14 December 2011

Rayfire Work

Now that I have had a few days to work singly on modelling and animation I have begun developing my skills using the Rayfire tool. To do this I started following a tutorial online (Link Below) which starts with you creating a grenade. Doing this took around an hour and not only showed me new techniques but taught me very simplistic ways to in harness the quality or a render with lighting and shading.

Tutorial Link: http://cg.tutsplus.com/tutorials/autodesk-3d-studio-max/3d_cg_vfx_autodesk_3dsmax_rayfire_break_glass_dynamics_glow_ball/


Studios before added shading

Render before added shading

Studios after added shading

Render after added shading

Tuesday, 13 December 2011

Populating Rooms

Today I went about populating the ground floors rooms, adding in the models we had built as a group in the past few weeks. This included heavy work on the library, museum and shop, adding models and textures. The main problem I found were resizing some items, notably the bookcases and books. To avoid this issue I used the originally sized models and then added more shelves to them.

Museum Room 1

Shop Room

Library Room


One new model I created was the postcard Rack, which I made to give the shop a more detailed appearance. This was made using blocks to create the shelving unit, and then used thin boxes piled together to give the appearance of postcards. After creating these i then desired to texture them with local images of Finchingfield, as well as the design team behind the animation/model (Us).

Postcard Rack

Monday, 12 December 2011

New Additions to Group Work

Over the past week I have created too extensions to the group work project. The first change was to the elevator, which involved a complete re-design as the original was model on a more universal elevator as opposed to the intended disabled platform. The new platform now acts as a moving platform rather then a lift, meaning that no support beams or pulley systems are needed to lift the platform. The doors are now glass and swing open rather then open as conventional lift doors open. Both doors are fitted with a door open button, as well as a lift call button.

New disabled lift


The second addition to the project was the new stairs. These have been straightened out, re sized and had the walls around them built out. At this moment in time it is difficult to tell whether there are railing's either side or not but they may be placed into the project later.

New stairs for the new building

Monday, 5 December 2011

Head So Far

I have been working hard on the head the past few weeks and I am now at the stage where my texture requires some detail. I fully created the texture and then decided to re-created the mouth after blurring it with the liquidation tool to much.

First generation of the texture


Second generation of the texture


Second generation texture applied to head model


 After finishing the second texture I noticed that my model had a slit in the nose and some small areas in the head that had become un-wielded. To this point I have tried altering the model but have been effecting the UVMap to much. I have recently learnt however that by collapsing the layers of the model into each other it is possible to modify the model without effecting the texture. I will be tring this in the next few hours.

Nose error

Texturing The Head

To texture the hair I first saved the UVMap image made in the previous blog and opening it inside of Photoshop. This gave me a clear layout of the shape, the texture would have to fill. The first step was to save the image as a Photoshop file and then apply it as a texture inside Max Studio's on my face, giving the face the outline texture. To create the face image I used patches of skin from the image I used as the guide to creating the face model.

The main creation of the texture
The texture view in Max Studio


I did this by using the lasso tool to select parts of the skin from the old image and then duplicating them on the texture file. I then scaled and placed them appropriately using the warp and blend tool.
The warp tool splits the selected object into a small number of separate areas, and allows the user to stretch and free form the image.

The Warp Tool
Once the shapes are image sections are in place, I then merged the layers (excluding the background and guide) and used the blend tool to create an texture that appeared to flow better. The blend tool works by selecting an area you wish to make flow into another, and using a sample of the second material's area creates a blend of the too.
Select the section you want to blend

Select the section you want to blend to

The blend tool merges the too selections and forms a smooth blend


Another tool I used, mostly for the lips and soon to be the eyes is the liquidation tool. This allows you to zoom into the image in great detail and use scaled brushes to manually move clumps of pixels around. This helped a lot in moving my lips up and away from my chin. The only draw back from using this tool is that moving to much can blur the image.

The mouth is too close to the chin and to thick round the edges


The lips have been pushed up slightly and moved inwards

Thursday, 1 December 2011

UVMaping the Head

After creating my basic head shape I then went on to modify certain areas, including the cheek bones, nose and eyes to make them more in line with the reference images. The next step on from this was to start UV Mapping my model. This meant deselecting symmetry and selecting all of the poly's faces with the paint tool, ensuring to leave the ear and surrounding areas as these would be done separately. I then put the face model inside of a cylindrical map, ensuring that there was enough space for the mirror object to fit inside with it.
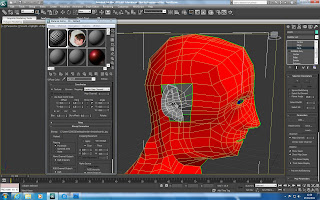
Face highlighted

From this i then applied a checkered pattern to the whole model to see where the texture was stretched out. This was to help the task of moving the mapping around to assist in placing the material equally. Clicking on "Edit" inside the mapping parameters brought up the editor, which can be seen in the image below. This allowed me to use the relax tool to spread the material vertex's out. This changed the way the material would be laid out, without changing the vertex's of the model.
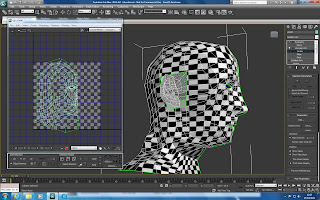
Using the editor

 After the model was spaced out efficiently, and I had checked for high numbers of inverted and overlapping faces I resized and fit the model to the texture background.
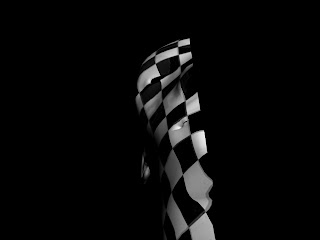
Render after UV Mapping
After the face was completed I then moved on to reapeating these stages for the ear, this time making the mapping with a pelt map insted of a cylindrical shape. After completing both of these steps I feel reasonably pleased with the results. I an see there are still errors, mostly in the neck and top of the head, but due to time and other work Im going to pursever with what I have.
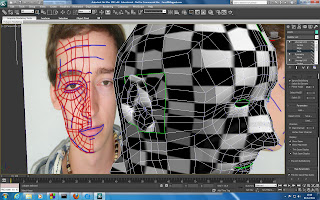
Ears UV Mapped

Tuesday, 29 November 2011

Elevator

To create the elevator I made a simple L shape with two boxes and then used the swift tool to split the polygons and extrude new shapes. I did this to create the box shape for the lift but maintaining two sided faces. After I got the basic shape i then went on to create a separate cone shape and use it, with the ProBoolean tool to create light wholes in the roof. The last stage of creation was the handling rail around the elevator. This was made using a cylinder which was then extruded and rotated to create a long bend.


First basic shape

Using symmetry to mirror the first half


Elevator with hand rail


After I had created the model I then used the symmetry tool to duplicate the other side, saving myself half time and work. To save more time when coming to animate I also made a Morpher version of the elevator with the doors closed, so that now the elevator could be easily animated into opening and shutting.

Elevator using Morpher